
Over the last few years Bob Harper, who hails from Manchester in England, has been doing a great job showing and publicising real Maine On2 on the UK Exhibition circuit with his “Franklin” module.
Pictured above is Bob’s new module “Megantic” at its first public outing at the ALSRM (Association of Larger Scale Railway Modellers) North 2016 Show at Wythenshawe yesterday (14th February 2016). The modules are parts of his On3/On2 layout located in the basement of his home which have been designed to be removable for exhibition purposes.
Bob has a very relaxed style of operating at UK Exhibitions, and so the controls are placed at the front to enable Bob to chat easily with the audience. It is not unknown for him to hand the controller to a member of the audience to allow them to run the trains.
Note that all the pictures in this post are shown reduced. By clicking on the pictures the larger versions are shown, use your browser back arrow to return to this page.

Bob sent the first pictures last week and wrote;-
“I’ve been working furiously on the Megantic module trying to get it mostly ready for its first proper outing at the Manchester O gauge show this coming weekend. This will be the last new station on the 2ft, as there is no more space in my basement! It would be nice if it was far bigger, but it’s the best I can do. Very roughly based on Bigelow, the granary and section hut come from Kingfield, station from Mount Blue Models kit and freight house (much reduced) from Bigelow, loco shed from Randoph (reversed), turntable from Bridgton, and factory (chair mill?) inspired by another Mount Blue Models kit. Come and see it and help operating next Sunday if you can get there. Real ale on tap at £2.50 a pint!”

In response to the posted question below Bob has replied;-
“the scenic station section is 80″ long by 15″ deep, and the fiddle yard adds another 40″ to the length. Because of the rotating top, this is effectively 36″ deep, though only 24” when stowed “line ahead”. Everything is very tight, both in length and depth, with the station restricted to Forneys; in order to get in a run-round loop long enough for a 2 car passenger train, l had to reduce the head-shunt by the tank to the bare minimum, and also the turntable, so tender locos won’t fit either. Of course, at home I can use a pilot loco to release the tender locos, but for exhibitions I will stick to the shorter trains and locos. The white background mill is not a Ken Berlo kit, as he has designed his with the freight doors at a pitch to match 2 Bachmann box cars. I scratch-built my version based on Ken’s, but put the doors on 28′ centres instead. I had also run out of window mouldings, so had to reduce their number!”
In December 2016 Bob posted to the Yahoo! group:-
“I decided to use LED lighting on my most recent layout, Megantic. I have used a double strip of Warm White LED’s as close to the front as possible and slightly angled to shine into the scenery. I played around with the height of the strips until I got a good general illumination, but the biggest improvement came when I added a ceiling so as to enclose the whole scene. Have a look at pictures of the layout on MaineOn2 FAQ’s. If you are able to enclose your scene like this, the result is very even and natural, and I’m pleased with it. However, I suspect that LED’s become more and more ineffective as the depth and height of the scene increase. So it’s a matter of trial and error to see what works best. One crucial thing I have discovered is to do all your scenic colouring using the final lighting that you intend to view the layout under. We built one layout forgetting this, and a brownish wall burst out into bright red when we put the exhibition lighting on!”

Bob’s modules are parts of his On3/On2 home layout which are removable for exhibition purposes where they are mated with a turntable style fiddle yard section to hold trains “off scene”. This type of layout is very popular on the UK Exhibition circuit. Bob’s open style makes it easy for the viewers to look over the stock held in reserve, rather than making them strain over view blocks.

The editors made a deliberate decision to publish these pictures at full frame to allow our viewers to see the backgrounds – which are typical of many UK shows.

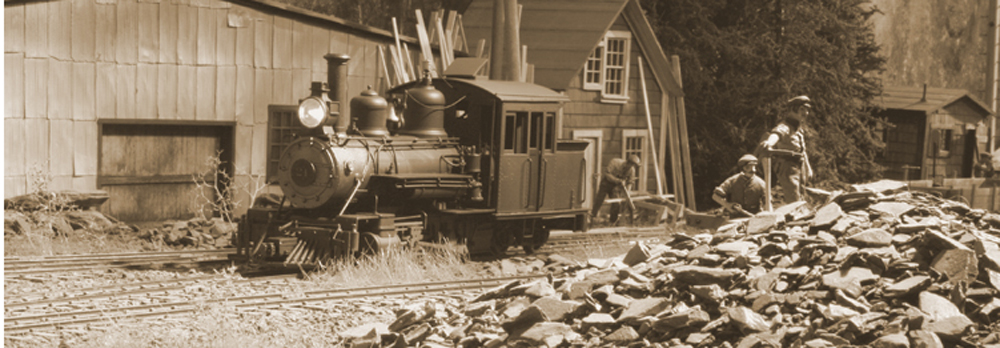
The section hut comes from the SR&RL at Kingfield.

The station was built from a Mount Blue Models kit of Bigelow Depot.


This structure was scratch-built and represents a prototype industry believed to be a chair factory. The design was based on the Mount Blue Models kit “Backdrop Industry #2”.

The loco shed is based on the Kennebec Central shed at Randoph (reversed) and the turntable is based on the B&SR’s at Bridgton.

The freight house is based on the SR&RL prototype at Bigelow but is much reduced to fit the available space.
Stuart Edmundson was at the show sent in the following pictures showing trains on the module.


Bob’s latest addition to his fleet of scratch built rolling stock is this caboose based on the early version of the Bridgton lines prototype.
Megantic at the Llandrinio Get Together, Sunday 3rd July 2016
This get together was organised by the UK Borders Model Railway Club for the Gauge O Guild at Llandrinio village hall. Llandrinio is just four miles up the road from Welshpool, which may be familiar to Two Foot Fans.

Bob Harpers’ introduction for the Megantic module.

The Megantic module plus turntable fiddle yard plus operator and spare seat set up in the corner of the main hall.

John Pearson concentrating on driving a train through the end board into the fiddle yard section.

Now you can see why John was concentrating! A tight squeeze through the endboard!

Bob Harper adjusting the track between the scenic module and the turntable fiddle yard. Also shows the rolling stock. Note that Bob uses acrylic based paints from “rattle cans” to paint his stock. For the passenger stock he uses Humbrol Brunswick Green, and Halfords Red primer or Red Plastic Primer for freight cars. The 2 reds are slightly different, so give a bit of variety.

Close up of the front mounted point control board and a tethered throttle . The Megantic module uses servos as point motors.

The mobile phone used as a throttle. The speed CV is correctly shown as 77, inadvertently set by the handling of the phone for this picture. It was very rapidly reset to slow the train down immediately afterwards.

This low angle shot catches the nicely done clouds on the backdrop.
The host club has now posted a report of the day. Click here to view on another page.
Some notes from Bob Harper on point tie-bars and reliability.

This photo shows part of my On2 yard, where I use hand-throws, which also throw a microswitch, hidden under the scenery, to change the polarity of the live frog.
Most of the points on my Franklin and Megantic modules are actuated by Tortoise switch motors. The slow movement is only part of the reliable operation that I seek to achieve. Ever since I started building my own track 40 years ago, I have completely avoided soldering the point blades to the copper-clad tie-bars. The endless flexing of the soldered joint will inevitably lead to the joint snapping eventually, (and sooner rather than later if you use solenoid type point motors), and the most used (and hence most important) points will go first – usually at about lunchtime on the Saturday of a 2 day exhibition. I’m sure you can remember seeing a large exhibition layout at a halt as somebody tries to solder the crucial points up again.
My tie-bars are still copper-clad for strength, but upside down, with a 0.8mm hole drilled through at the position of each rail. A short length of brass wire in the shape of a Z is pushed through each hole and soldered to the side of the point-blades but obviously not soldered underneath to the copper surface. I used to use dressmakers pins pushed up from underneath and then bent over and soldered to form the pivots, but all the ones I can get now seem to be far too brittle and snap when I try and bend them.
Electrically it as all very simple – what I would call “best-practice” DC – though in fact I operate the whole of my 2ft and 3ft empire, including the Franklin and Megantic modules using DCC. This means having live switched frogs, which is easily done using one of the changeover switches on the point motors or using an extra set of poles on the toggle switches that throw the point motors which is my preferred method. I have found that separate electrical feeds to every length of rail, no matter how short they may be, are essential. I do have isolating sections on the loco shed roads, and more could easily be added for a DC layout, but I use them to cut down on the noise from stabled locos that are DCC sound fitted.

This photo shows part of my On3 yard before I painted and ballasted it, so the tie-bars can be seen better. I have used all copper-clad ties for quick, soldered, construction, but on more visible sections, I would mostly use spiked, wood ties apart from a few copper-clad ones to give strength at the switch throw and frog. The copper-clad comes in paxolin-backed (poor) and glass-fibre (good!); looking carefully you can see the lighter green mark across parts of the tie bar – this is where I have cut insulating gaps underneath. Depending on where I can fit the Tortoise underneath dictates where the gaps go – I try to leave the area underneath where the pivot pin comes through completely isolated, just in case!

This photo shows what the copper-clad ties look like when painted and ballasted.

And here’s a picture of the same area of real Maine Two Foot point taken earlier this year.
Note that Bob’s Franklin module has featured in a number of publications such as the UK 7mm Association newsletters and the Narrow Gauge & Shortline Gazette, September/October 2014 edition, and attended the US National Narrow Gauge Convention in Augusta, Maine in September 2016.
Links to other Bob Harper posts
Maine On2 layouts – Bob Harper’s Franklin at Tolworth, November 2021
Maine On2 layouts – Bob Harper’s New Sharon exhibition layout
Maine On2 layouts – Bob Harper’s Franklin module goes West …..to New England
Maine On2 layouts – Bob Harper’s Franklin module
Updated: 13 February 2022.

Very, very impressive! I always loved what a UK modeler can accomplish in limited space. Do you happen to know the dimensions of the module?
Bob Harper has published the dimensions, these are now incorporated into the text above.
Thanks very much for adding the dimensions to the article. I’m planning an On30 layout in a room roughly 10’x12′ with a shelf width of 18-20″. I was worried that wasn’t going to be deep enough since this will be my first effort outside of HO scale. I was expecting Bob’s module to be a lot larger than it is, so it is very nice to see what can be done in just 15″.
Pingback: Bob Harper’s Franklin module | The Maine On2 FAQ
Pingback: 100, 000 viewings! | The Maine On2 FAQ
Pingback: Top posts for 2017 | The Maine On2 FAQ
Pingback: Maine On2 layouts – Bob Harper’s Franklin module goes West …..to New England | The Maine On2 FAQ
Pingback: Top posts for 2018 | The Maine On2 FAQ